

If you want to do anything with data, you must first get that data into your worksheet. Excel can import data from a text file and can also retrieve data from websites. Here, you will find ways of importing data into Excel.
Download Practice Workbook
3 Ways of Importing Data in Excel
We are discussing here which file types Excel can open directly. To get data from file types use this command: File >> Open >> Browse. The following image shows the list of the file types Excel can open.

1. Importing Data from Different Files
Here, we will show you ways of importing data from different types of files in Excel using the Get Data feature from the Data tab. Go through the steps given below to import files into your Excel worksheet.
1.1. Import Data from Several Excel Files
Excel 2013 is backward compatible. Backward compatibility means that when a new version of Excel comes on the market, this new version is compatible with the old version of Excel files. Excel 2013 supports XLSX, XLSM, XLSB, XLTX, XLTM, and XLAM file types. In addition to supporting these current file formats, Excel 2013 can open workbook files from all previous versions of Excel.
- XLS: Binary files created by Excel 4, Excel 95, Excel 97, Excel 2000, Excel 2002,
and Excel 2003 - XLM: Binary files that contain Excel 4 macros (no data)
- XLT: Binary files for an Excel template
- XLA: Binary files for an Excel add-in
Excel also supports one file format created by other spreadsheet software: ODS, the OpenDocument spreadsheet format. ODS files are created by a variety of “open” source software, including Google Drive, OpenOffice, LibreOffice, StarOffice, and others.
Note: Excel does not support Lotus 1-2-3, Quattro Pro, or Microsoft Works files.
You can import data into Excel from another Excel file either directly loading the data or transforming using Power Query Editor. Follow the steps given below to import data into Excel from another Excel file by transforming the data using Power Query Editor.
Steps:
- Firstly, go to the Data tab >> click on Get Data >> click on From File >> select From Excel Workbook.

- Now, the Import Data box will open.
- Then, select the Excel File from which you want to import data into this active worksheet. Here, we will select Student Information named Excel File.
- After that, click on Import.

- Next, the Navigator box will appear.
- Then, select the table from where you want to import data into this active worksheet. Here, we will select the Importing Data from Excel File named table.
- Afterward, click on Transform Data.

- Now, the Importing Data from Excel File table will open in Power Query Editor.
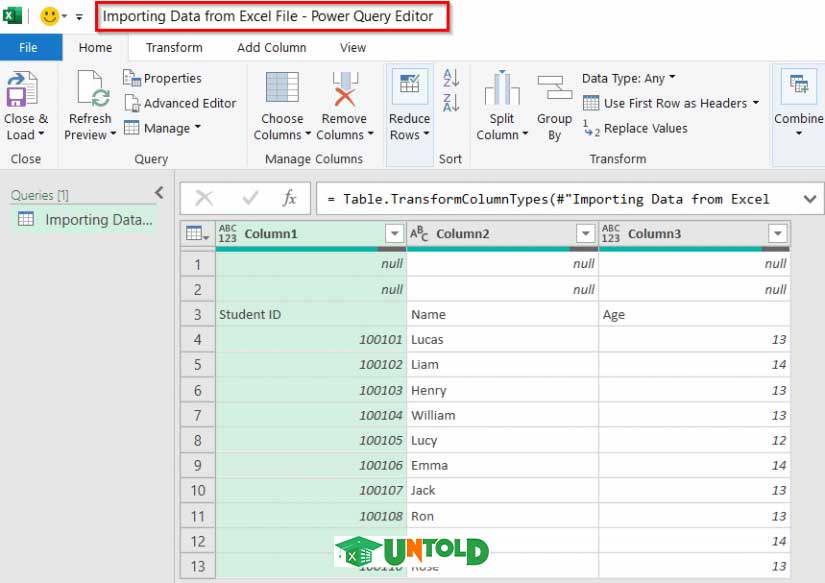
- After that, click on Reduce Rows >> click on Remove Rows >> select Remove Top Rows.

- Next, the Remove Top Rows box will open
- Then, insert the Number of rows you want to remove. Here, we will insert 2.
- After that, click on OK.

- Now, click on Use First Row as Headers to select the first row as header.

- Then, click on Close & Load >> select Close & Load To.

- Next, the Import Data box will open.
- After that, select how you want to view this data in your workbook. Here, we will select Table.
- Then, turn on the Existing worksheet option.
- Now, insert a Cell reference where you want to put the data. Here, we will input Cell B4.
- Afterward, click on OK.

- Finally, you will import data into Excel from another Excel file using Power Query Editor.
Read More: Excel Macro: Extract Data from Multiple Excel Files (4 Methods)
1.2. Importing Data from Text Files in Excel
In a text file, you will find raw characters, with no formatting. Excel can open almost all types of text files:
- CSV: Comma-separated values. Columns are delimited by a comma, and rows are delimited with a carriage return (Enter).
- TXT: Columns are delimited with a tab, and rows are delimited with a carriage return (Enter).
- PRN: Columns are delimited with multiple space characters, and rows are delimited with a carriage return (Enter). Excel imports this type of file into a single column.
- DIF: The file format originally used by the VisiCalc spreadsheet. It is rarely used.
- SYLK: The file format originally used by Multiplan. It is rarely used.
Most of these text file types have variations. For example, text files produced in a Mac environment have different end-of-row characters. Excel can easily handle the variants without a problem.
You can import data into Excel from Text files following the steps given below.
Steps:
- Firstly, go to the Data tab >> click on Get Data >> click on From File >> select From Text/CSV.

- Now, the Import Data box will open.
- Then, select the Text File from where you want to import data into this active worksheet. Here, we will select Using Text Files to Import Data named Text File.
- After that, click on Import.

- Next, a box containing the data of the text file will open. Here, it will automatically select Semicolon as Delimiter.
- Afterward, click on Load.

- Finally, data from the Text file will be imported into Excel.
Read More: How to Import Text File to Excel (4 Easy Ways)
1.3. Loading Data from Web Page
You can import data from most of the web pages in Excel. Go through the steps given below to import data from web pages.
Steps:
- In the beginning, go to the Data tab >> click on Get Data >> click on From Other Sources >> select From Web.

- Now, the From Web box will appear.
- Then, insert the URL from where you want to import data in your Excel worksheet.
- After that, press OK.

- Next, the Navigator box will open.
- Afterward, select the table you want to import. Here, we will select the Population Aged 65 and Older table.
- Then, click on Load.

- Finally, data will be imported into Excel from the Web Page.

Read More: How to Import Data into Excel from Web (with Quick Steps)
1.4. Importing Data from PDF Files
We can also import data from PDF files in Excel. Follow the steps given below to import data from PDF files in Excel.
Steps:
- In the beginning, go to the Data tab >> click on Get Data >> click on From File >> select From PDF.

- Now, the Import Data box will open.
- Then, select the PDF File from which you want to import data into this active worksheet. Here, we will select Importing PDF Files named PDF File.
- After that, click on Import.

- Next, the Navigator box will open.
- Afterward, select the table you want to import. Here, we will select the Table001(Page1) table.
- Then, click on Load.

- Finally, data will be imported into Excel from the PDF File.

1.5. Loading Data from Microsoft Access Database
Excel 2013 can open the following database-related file formats:
- Microsoft Access files: These files have various extensions, including MDB and ACCDB.
- dBase files: Excel 2013 support file produced by dBase III and dBase IV. Excel does not support dBase II files.
You can perform various types of database connections with databases through Excel. After connecting to databases, you can perform a query to retrieve data selectively rather than the entire database.
You can import data into Excel from Microsoft Access Database following the steps given below.
Steps:
- Firstly, go to the Data tab >> click on Get Data >> click on From Database >> select From Microsoft Access Database.

- Now, the Import Data box will open.
- Then, select the Microsoft Access Database file from where you want to import data into this active worksheet. Here, we will select Importing Data from Microsoft Access Database named File.
- After that, click on Import.

- Next, the Navigator box will open.
- Afterward, select the table you want to import. Here, we will select the Importing Data from Microsoft Access Database named table.
- Then, click on Load.

- Finally, data will be imported into Excel from Microsoft Access Database.

1.6. Using XML Files to Import Data in Excel
XML (Extensible Markup Language) is a text file format used to contain structured data. Data is enclosed in tags, which also serve to describe the data.
First, download the xml files from here XML files
You can open simple XML files with little or no effort. Complex XML files will require some work, however.
Now, we will show you how you can import data in Excel from an XML file. Follow the steps given below to do it on your own.
Steps:
- In the beginning, go to the Data tab >> click on Get Data >> click on From File >> select From XML.

- Then, the Import Data box will open.
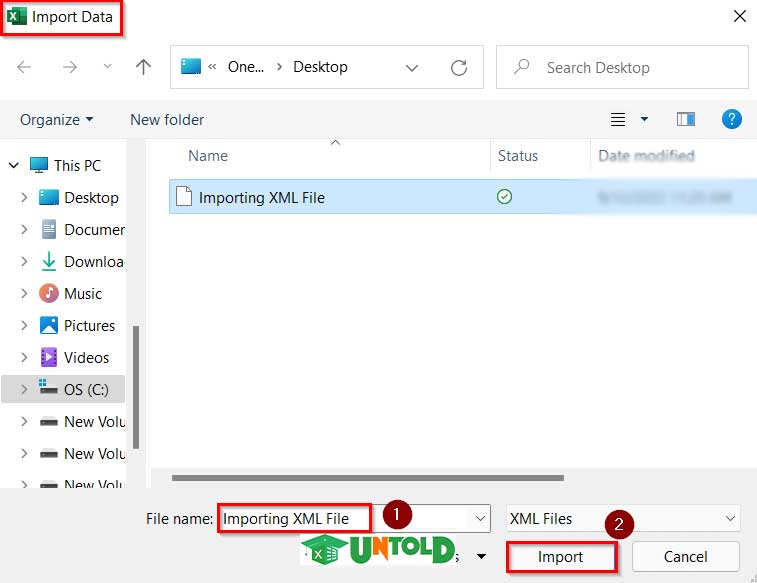
- Next, select the XML file from where you want to import data into this active worksheet. Here, we will select Importing XML File named XML File.
- After that, click on Import.
- Now, the Navigator box will open.
- Afterward, select the table you want to import. Here, we will select the url named table.
- Then, click on Load.

- Finally, you will see that the data from the XML File is imported in the Excel worksheet.

Read More: Transfer Data from One Excel Worksheet to Another Automatically
2. Use of Copy Paste Feature to Import Data in Excel
Sometimes it is better to try the standard Copy Paste feature. Say we want to do our previous job with this simple Copy Paste feature.
Going through the steps given below you can easily get data from a text file in your Excel worksheet using the Copy Paste feature.

Steps:
- Firstly, open the Text file from where you want to copy the data to paste into the Excel file. Here, we will open a Text file named Using Text Files to Import Data.
- Then, select the data and press CTRL+C.

- After that, select the Cell where you want to paste the data. Here, we will select Cell B4.
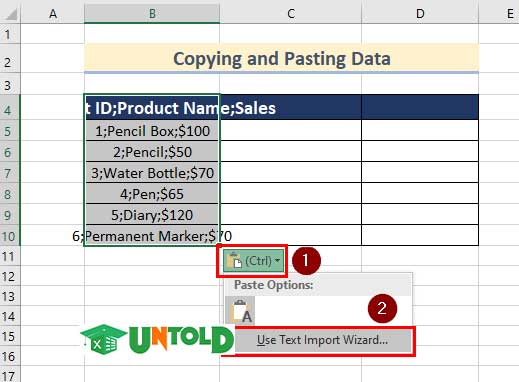
- Next, press CTRL+V to paste the data.

- Then, click on the Ctrl button >> click on Use Text Import Wizard.
- Now, the Text Import Wizard box will open.
- After that, click on Next.

- Next, select Semicolon as Delimiters.
- Again, click on Next.

- Finally, click on Finish.

- Thus , you can copy paste data from a Text file to an Excel worksheet.

Read More: How to Import Text File with Multiple Delimiters into Excel (3 Methods)
3. Using VBA to Import Data in Excel
In the final method, we will show you how you can import data in Excel from a file of your choice using VBA. Follow the steps given below to do it on your own.
Steps:
- In the beginning, go to the Developer tab >> click on Visual Basic.

- Now, Microsoft Visual Basic for Application box will open.
- After that, click on Insert >> select Module.

- Then, write the following code in your Module.

Code Breakdown
- First, we created a Sub Procedure as Import_Data_Using_VBA.
- Then, we declared Location_of_File as String.
- After that, we used Location_of_File to open a file using the GetOpenFilename method.
- Next, we used the If statement to check if Location_of_File is False, then it will Beep and exit sub.
- Then, we set Application.ScreenUpdating is False.
- Afterward, we set Import_Data to open Filename Location_of_File using the Open method.
- Next, we copied Cell range A1:C7 of Worksheet1 from the Import_Data file using the Copy method.
- Then, we pasted the data in Cell B4 of Sheet7 using the PasteSpecial method.
- After that, we closed Import_Data.
- Finally, we set the Application.ScreenUpdating is True.
- Next, click on the Save button and go back to your worksheet.

- After that, go to the Developer tab >> click on Macros.

- Now, the Macros box will appear.
- Then, select Importing_Data_Using_VBA.
- After that, click on Run.

- Now, the Open box will appear.
- Afterward, select the file you want to import. Here, we will insert Using VBA to Import Data named Excel File.
- Then, click on Open.

- Thus, you can import data from a file using VBA.

- Finally, you can format your data in Excel according to your preference.

Conclusion
So, in this article, you will find 3 ways of importing data in Excel. Use any of these ways to accomplish the result in this regard. Hope you find this article helpful and informative. Feel free to comment if something seems difficult to understand. Let us know any other approaches which we might have missed here. And, visit ExcelUntold for many more articles like this. Thank you!
No comments:
Post a Comment