Task Pane is a useful tool using which you can tweak different settings quite easily. If you are curious to know different Task Pane and their operation, then this article may come in handy for you. In this article, we discuss how you can use the Task Pane in Excel better with elaborate explanations.
What Is Task Pane in Excel?
The Task Pane is a standard interface element in Microsoft Office applications, including Word, Excel, PowerPoint, and Outlook, and it is located on the side of the window. Users may access interface controls in the form of Task Panes, allowing them to execute code that modifies documents, and emails, or displays information from a data source. Depending on your current activity, it will provide you with a set of relevant links and commands. For efficient job completion, the Task Pane adapts itself automatically.
List of Available Task Panes in Excel 365
The number of Task Panes available in Excel is numerous. For various applications and functions, we can add various Task Panes. Each task/ application/ feature has a unique set of Task Panes for them. They are listed below.
Accessibility Checker – This pane checks the file condition.
Actions – Capable of being utilized for individualized document creation (Excel and Word). Inaccessible via the user interface.
Clipboard – The Microsoft Office Clipboard is a collection of features that allow users to easily copy and paste data between various Office programs.
Data Selector – Assists in picking the best form of related data.
Document Recovery -When Excel restarts following a crash, this window opens automatically. This shows you where you last saved your work, so you may possibly restore a current version of the file if you lose the current one. This is shown in Microsoft Excel stops suddenly without giving you a chance to save. Either your file will open immediately, or this Task Pane will appear with three versions of your file to choose from.
Format Chart Element – The chart pane is the primary way to tweak the chart’s appearance. You can make various modifications to charts and chart elements through this pane.
Analyze Data -this pane is known as Ideas.
Navigation – Find and utilize items in your workbooks like tables, graphs, PivotTables, and pictures.
Selection – Selection Pane contains the Home tab, Editing, Find & Select.
Thesaurus – This Task Pane is basically a dictionary that can give you give, synonyms and antonyms for different words.
Translator -This helps to translate one language to another.
Watch Window – in the watch window, we can Add the Formulas tab, with Formula Auditing.
How to Add Task Pane Add-ins in Excel
In Excel, you can add-ins of different applications and services through the Microsoft store.
Steps
- Adding desirable app add-ins is quite easy in Excel.
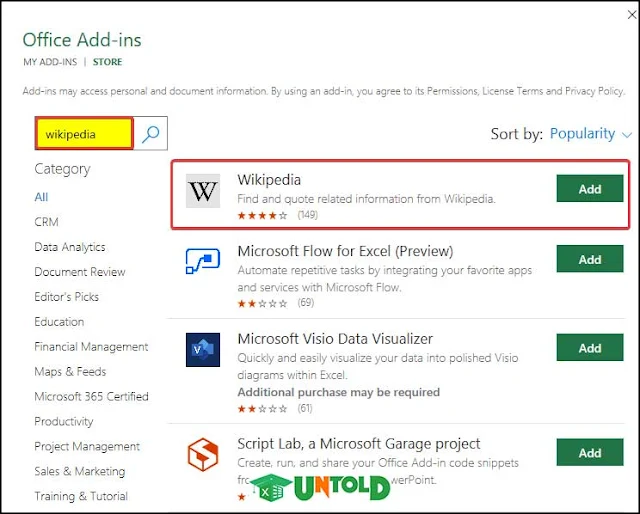
- In order to add an add-in, you need to go to the Insert tab and then click on Get Add-Ins.
- Clicking on the Get Add-ins will open the Microsoft Add-ins Store.
- From that store, search for Wikipedia.
- The search result returns to Wikipedia.
- Click on the “Add“
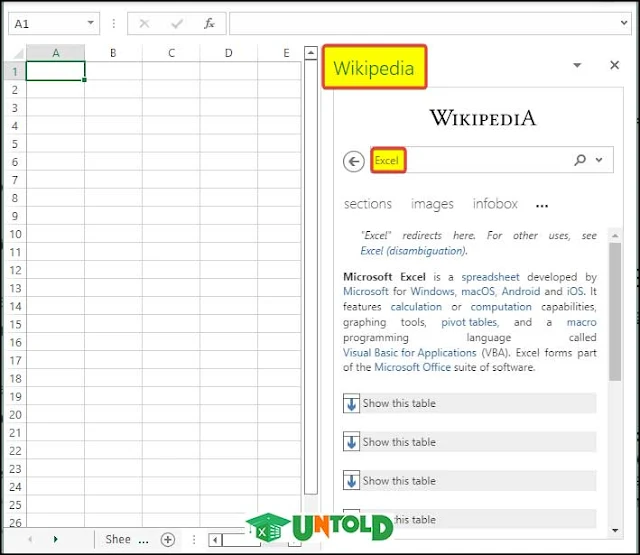
- Clicking adds the Wikipedia Add-ins to the worksheet.
- You will now see that Wikipedia is added to the worksheet.
- And there is a pane on the right side of the worksheet.
- You can directly search for the relevant information in this pane and get information immediately.
How to Show Task Pane in Excel
The Task Pane is another functional user interface in Excel. Some commands in Excel will respond automatically with Task Panes. For example, if you work with a picture right-click the image and choose Format Picture, and Excel will display the Format Picture Task Pane. The Task Pane is similar to a dialog box except that you can keep a Task Pane visible as long as you want.
Steps
- Select your Image and right-click on it.
- From the context menu, click on Format Pictures.
- Then the Picture Task Pane will open.
- In the Picture Task Pane, we can see various options right under the Effects command.
A new feature after Excel 2013: The role of Task Panes has increased dramatically after Excel 2013. For example, if you work with a chart, you can access a chart-related Task Pane that has an extensive number of commands for every element within the chart.
- Using some Task Panes is not so easy. The Format Picture Task Pane has four icons- Fill & Line, Effects, Size & Properties, and Picture.
- The names are shown when you hover your mouse pointer over the icons. For example, click an icon and you will find a command list below the icon tab.
- Click the Shadow command from the list and you will be shown some options in drop-down style for that command.
How to Use Task Pane in Excel
Adding a Task Pane is not everything. To get the best out of it, we need to learn and understand how to use it properly.
There’s no OK button in a Task Pane. If your job is done with a Task Pane, then you can follow the below procedure to navigate within the cell.
Steps
- Click the Close button (X) in the upper-right corner.
- Using the Task Pane through the keyboard is simple.
- Just make sure that the Task Pane is displayed in your workbook and press F6 to activate the Task Pane. Then use the tab key, the arrow keys, the spacebar, and other keys to navigate within the Task Pane.
2. Setting Position of Pane in Excel Worksheet
By default, the Task Pane is placed on the right side of the Excel window. If you want, you can move it anywhere you like, by clicking its title bar and dragging it. You can also use the ‘Task Pane Options’, an icon beside the ‘Close‘ button. There are three options here-Move, Size, and Close.
3. Setting Task Pane in Different Place
Excel will remember the last position of your Task Pane, so when you will use the Task Pane next time, it will be right there where you left it.
Tips:
You can’t navigate within a Task Pane through the keyboard using Tab, Spacebar, the Arrow keys, and Alt keys like you use to navigate within a dialog box. First of all, you have to activate the Task Pane by pressing the F6 key. Then use Tab, Spacebar, the Arrow keys, and Enter from your keyboard to navigate within a Task Pane.
How to Open Research Task Pane in Excel
The research Task Pane is a very useful tool for conducting various research-related projects. Having a side panel is a quick way of searching for relevant topics.
Steps
- Opening the research Task Pane is quite straightforward.
- Simply press Alt+select any cell in the worksheet.
- Doing this will automatically open the Research pane on the right side of the sheet.
- On that sheet, you can see the dictionary or language options in a dropdown menu.
- You can type various research-related keywords inside the box and gain knowledge about them.
How to Disable Research Task Pane in Excel
Research panes sometimes pop us annoyingly in the middle of work. This can severely damage the workflow and can waste time. To counter this issue, we presented a way in which you can remove the research pane in Excel in easy steps. We are going to use Excel VBA in order to disable the research pane in Excel.
Steps
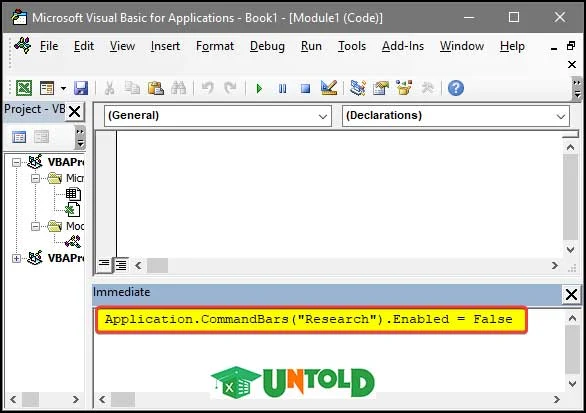
- First, go to the Developer tab and click on Visual Basic. If you don’t have that, you have to enable the Developer tab. or you can also press ‘Alt+F11’for open the Visual Basic Editor.
- Then there will be a new dialog box, in that dialog box, click on Insert > Module.
- Next, in the Module editor window, press Ctrl+G.
- Pressing this button will open the Immediate window right below the editor window.
- Type the following code and press enter.
Application.CommandBars("Research").Enabled = False
- After pressing Enter, you will notice that the research pane no longer pops up when you press Alt and select a cell.
How to Open Alt Text Task Pane to Add or Modify Alt Text in Excel
Adding Alt text to your image is an excellent way to describe your image and the purpose behind it. Using the Alt text pane, you can do this work quite efficiently
Steps
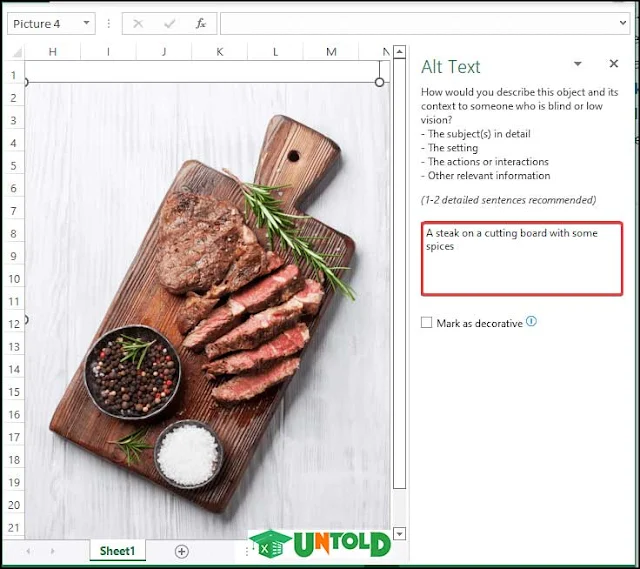
- To view an Alt text of an image, you can easily add it from the Insert Image option in the sheet.
- After the image is in the worksheet, right-click on it and click on Edit Alt Text.
- Then the Alt Text side panel will open on the right side of the panel.
- Now to make the Alt text pane move around the sheet, click on the downward arrow on the pane.
- In the dropdown menu, there are “Move, Resize, and Close.” options.
- You can click Move and drag the pane all around the sheet. And you can place the pane in any place.
- You can also resize the pane by clicking on Resize.
- And can close the pane by clicking Close.
- You also can make the text decorative by tick marking the check box below the Alt text box.
- Meaning ordinary people who don’t have any access to the document cannot read the Alt text.
How to Use XML Source Task Pane to Map XML Elements
XML is a layer-based file format. Used extensively for Excel. When loaded in Excel, those layer elements can be easily accessible and modified to one’s need.
Steps
- To show the XML source pane, you need to first load the XML file into the worksheet.
- To load an XML file, click on the Import command from the Developer tab.
- Then there will be a small window where you need to select the file.
- After you select the file, the XML file will load into the sheet.
- To see the Task Pane of that file, you need to click on the Source from the Developer tab.
- After clicking Source, the Task Pane will open on the right side of the sheet.
- The structure and the layer of the XML file will be shown in different folders.
- Furthermore, you can tweak a lot of settings from the Options below the pane.
Preview Data in Task Pane -As you’ve imported XML metadata also with an XML map within the same Excel session, sample data will show up in the component list whether this box is in check.
Hide Help Text in the Task Pane – Displays contextual help text beneath the element if enabled.
Automatically Merge Elements When Mapping – If the box is marked, the contents of an XML list will grow whenever you select an item snd drag it into a cell next to it.
My Data Has Headings – If you map recurring elements to a worksheet and choose to use the current data as column headings, the headings will be pulled from the existing data.
Hide Borders of Inactive Lists – If this box is ticked, the margins from the XML element list will not be shown if a cell is beyond the list chosen.
Mapping Elements
Users may establish a connection between a cell and an XML element by mapping the element to a single cell or a series of cells.
- Goto Data > XML > Source.
- Click on the items you want to map inside the XML task window, and they will appear in your worksheet.
- If you want to pick several, non-contiguous components, click one of them while pressing Ctrl.
- To place those element(s) on the worksheet, drag it there.
- Each element that is presently mapped inside the Source pane is bolded in Excel.
- Choose your preferred approach to handling labels and column titles.
How to Use Document Recovery Task Pane in Excel
This is one of the most useful Task Pane types in Excel. Due to myriad reasons, Excel could shut down suddenly, and it could result in heavy data loss or even file corruption. This feature enables us to restore unsaved files and save precious time.
Steps
- The solution is quite straightforward. Open Excel once again.
- If there is any unsaved file, Excel has a recovery option that can let the user recover and save the file once again.
- The recovery pane will start on the right side of the Sheet, and the sheet contains the options needed for the recovery
- For example, if you have any file recovered, the file will be shown on the right side of the sheet.
- You can also see the repairs done on the file.
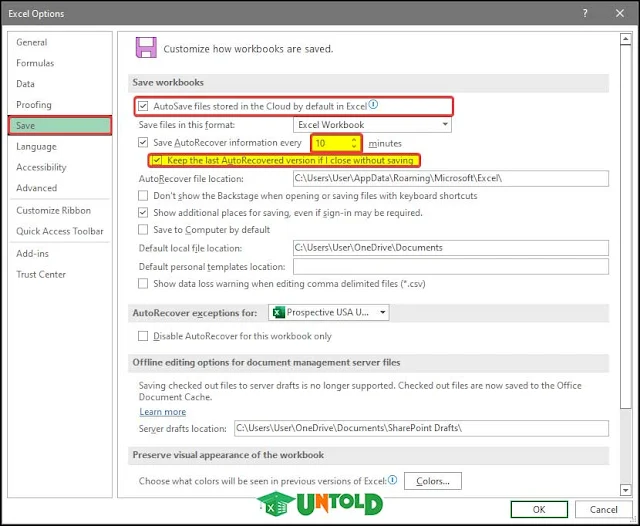
- For being on the safe side, try to enable autosave in the settings menu and keep the time period between the autosave minimal.
- To enable autosave, click on File > Options.
- Then click on Save.
- In the right window, keep the Last AutoRecovered version if I close without saving.
- Tick the check box Save AutoRecovered information every box and set your preferred autosave time interval.
- Click OK after this.
Conclusion
To sum it up, the issue of how we can open a workbook with variable names using VBA is discussed here by 5 different examples. The VBA Macro method requires prior VBA-related knowledge to understand from scratch.
For this problem, a macro-enabled workbook is available to download where you can practice these methods.
Feel free to ask any questions or feedback through the comment section. Any suggestion for the betterment of the ExcelUntold community will be highly appreciable







No comments:
Post a Comment